Table Of Content
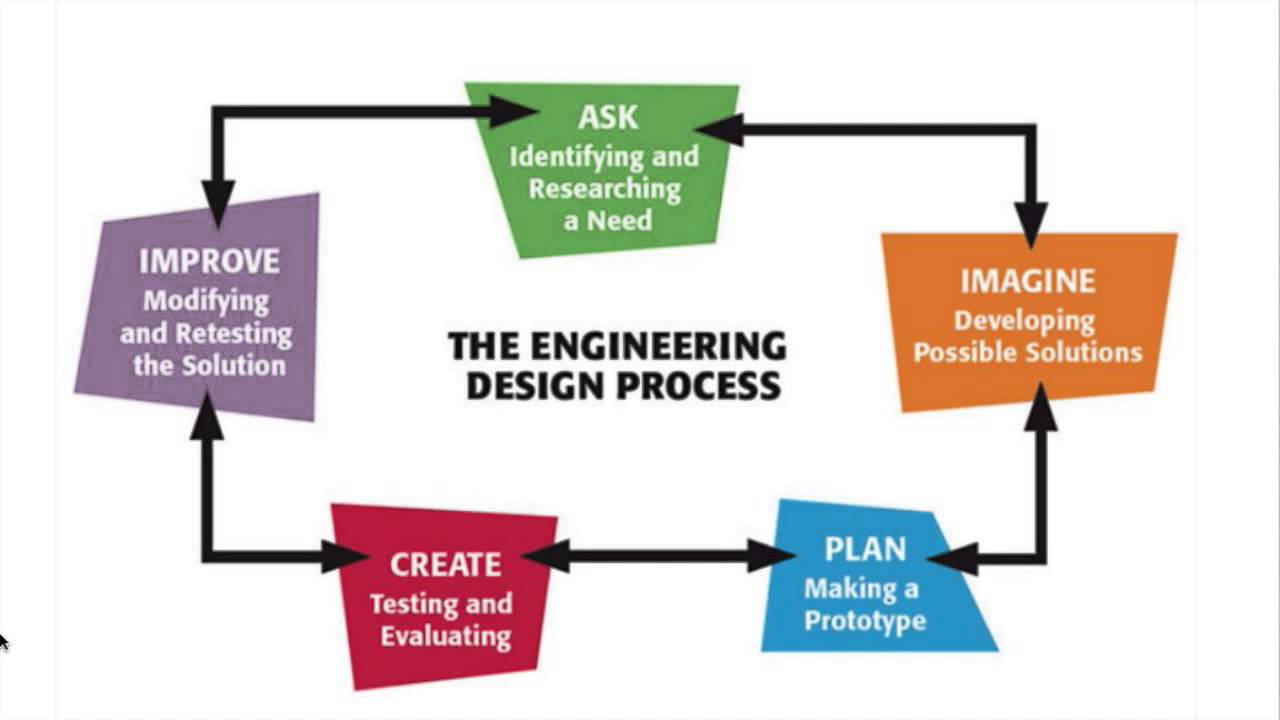
Justifying decisions is an essential part of the design process as it helps to ensure that the final product meets the required specifications and functions as intended. By justifying each decision, engineers can also communicate their thought process to others involved in the project, such as clients, stakeholders, or team members, and gain their trust and support. Students are given a biomedical engineering challenge, which they solve while following the steps of the engineering design process. In a design lab environment, student groups design, create and test prototype devices that help people using crutches carry things, such as books and school supplies. The engineering design process is a series of steps that guides engineering teams as we solve problems. The design process is iterative, meaning that we repeat the steps as many times as needed, making improvements along the way as we learn from failure and uncover new design possibilities to arrive at great solutions.
Design Methodologies
Once you have completed your test phase, you’ll have to make a final decision on your design. You must take all your data from the test phase into account and arrive at an appropriate solution. If you’re unsatisfied with the results of your testing, return to the previous steps of the process and try again. The third step in the design process is usually dedicated to research. This is where you can further develop your ideas, while understanding what has succeeded or failed in similar projects in the past.
Build a Prototype
Students apply their knowledge of constructing and programming LEGO® MINDSTORMS® robots to create sumobots—strong robots capable of pushing other robots out of a ring. To meet the challenge, groups follow the steps of the engineering design process and consider robot structure, weight and gear ratio... Review the engineering design loop by conducting the pre-activity assessment described in the Assessment section. This asks the teams to engage in a 10-minute design challenge and record their efforts to complete each step in the process. As a class, discuss any questions that arise about the design loop. The next step is establishing the specifications our solution will have, and the requirements needed for the proper functioning of such.
Identify the Problem
Use the "return to top" button to return to the diagram for more exploration. To conclude, conduct the post-activity assessment described in the Assessment section to help students relate the project to some aspect of their own lives. This role-reversal exercise asks students to imagine they are members of the target population and develop three questions that they would ask the project engineers. Divide the class into groups that will keep the same team members throughout the design project (all six activities). As we have outlined our specifications and requirements, we have also gained a thorough understanding of what the problem represents and what the solution would be. This is the step where we choose the best solution and start developing a plan to carry it out.
Middletown elementary students blend engineering and math in tiny house project - NBC Connecticut
Middletown elementary students blend engineering and math in tiny house project.
Posted: Mon, 15 Jan 2024 08:00:00 GMT [source]
Gaining insight into who or what the problem affects directly will help us find a solution. We also need to know what alternatives already exist and that are trying to solve the same problem we are. Identifying what has worked before, what hasn’t, and what could be of additional help is key. The Science Buddies Engineering Challenge is an annual challenge for students in grades K-12. Each year, students are presented with an engineering challenge that uses a limited number of materials.
By activity end, they are able to control LEDs and motors wirelessly using Arduino microcontrollers and XBee shields. Students work through an online tutorial on MIT's App Inventor to learn how to create Android applications. Using those skills, they create their own applications and use them to collect data from an Android device accelerometer and store that data to databases. Students are introduced to the biomechanical characteristics of helmets, and are challenged to incorporate them into designs for helmets used for various applications.

Activity Extensions
Students develop an app for an Android device that utilizes its built-in internal sensors, specifically the accelerometer. The goal of this activity is to teach programming design and skills using MIT's App Inventor software (free to download from the Internet) as the vehicle for learning. Students apply the concepts of conduction, convection and radiation as they work in teams to solve two challenges.
Working as if they are engineers who work for (the hypothetical) Build-a-Toy Workshop company, students apply their imaginations and the engineering design process to design and build prototype toys with moving parts. The product design teams use the engineering design process during the design and development of new products. It is different from the scientific method that involves making observations by doing experiments. Problem definition is the first, and arguably the most important, among engineering design process steps.
Artist and engineer, Theo Jansen, sees both disciplines as working hand-in-hand. Use your research as a springboard, but don’t adhere to the structures of previous projects. Allow yourself to find creative steps and solutions that others haven’t considered. As nuclear engineer and theoretical physicist, Freeman Dyson, once pointed out, the ideal is to work with a few ideas as possible. The second step in the design process is defining and streamlining your goals for the project.
Prototyping is crucial for validating the engineering design before it goes into full-time production. Due to the complex nature of engineering design projects, mistakes are expected to occur. The prototyping stage sifts out such design flaws and allows designers to improve the design over iterations.
The process is iterative and can be repeated many times over allowing for further improvements before a final design is converged upon. Practical skills will be developed through hands-on exercises covering the entire design process, from conceptualization and analysis to prototyping and evaluation. Additionally, participants will learn to leverage modern engineering tools and software to enhance both the creative and technical aspects of their projects. Students are introduced to the concept and steps of the engineering design process and taught how to apply it. In small groups, students learn of their design challenge (improve a cast for a broken arm), brainstorm solutions, are given materials and create prototypes.
Big Bolt makes the best bolts and fasteners to ensure that your product's various components remain intact. The internet is bursting with resources to help you rock the EDP teaching game. From free STEM lessons to engaging activities and handy instructional videos, it’s all just a click away. Science writer, Steven Johnson, has spoken about breaking the isolation of the engineering process. There comes a time when you must present all of your findings, as clearly as possible, and allow your design to exist outside of your own imagination.
Students design and develop a useful assistive device for people challenged by fine motor skill development who cannot grasp and control objects. In the process of designing prototype devices, they learn about the engineering design process and how to use it to solve problems. In this activity, students work to solve the problems of a local popsicle shop while learning how scientific and engineering concepts play a part in behind-the-scenes design. Engineering is formulating a problem that can be solved through design.
But other questions still had to be answered in this step, like how much weight it will need to hold, how big it will be, and what material it should be made out of. Fasteners are designed to hold different parts in place, ensuring that whatever you are building remains intact during use. Comprehensive product analysis is essential for measuring the product's success. User feedback is one of the most important aspects of product analysis.
To support their design work, they learn about materials properties, energy types and conservation o... In this activity, students design and build model houses, then test them against various climate elements, and then re-design and improve them. Using books, websites and photos, students learn about the different types of roofs found on various houses in different environments throughout the world.... Many times the solution to a problem involves designing a product (like a machine or computer code) that meets certain criteria and/or accomplishes a certain task. This process is different from the Steps of the Scientific Method, which you may be more familiar with.
They simulate the cook stove scenario and follow the engineering design process steps, including iterative trials, to increase warmth inside a building while reducing air quality problems. Video lesson, Science Buddies teaches students about the engineering design process. The video lesson guides students in a hands-on activity in which they need to develop paper airplanes that meet certain requirements.


No comments:
Post a Comment